This cheat sheet covers the settings you can edit when you add a Popup Maker split test from the Popup Maker > Split Tests admin page.
After you click Add Split Test, you’ll go through a 5-step Create Split Test wizard to set up and add the test.
Create Split Test Wizard
First, you need to pick a popup to test. Then you can step through the wizard to set up and create your split test.
New Split Test > Pick a popup to test on
Popup: Selects the popup you want to split test from the drop-down list.
Create Split Test Steps
The following are the five steps for creating a split test.
- Test type
- Variants
- Launch
- Document
- Review

Let’s go through each step now.
Step 1: Test type > What do you want to test?
- Headline: Tests the popup’s title text. The control variant always uses the popup’s current title. Each treatment variant overrides the title for visitors assigned to it.
- Content: Tests block-level content inside the popup. Set up variant labels and weights here. After the wizard finishes, open the popup editor and assign blocks to each variant.
- Settings: Tests display setting overrides such as animation, size, or position. The control uses current settings. Each treatment overrides specific settings. You must create a Settings split test from the block editor.
- Popup vs Popup: Tests two entirely different popups against each other. Variant A is the popup you started from. You pick or clone another popup for Variant B.
- Holdout: Measures the true impact of showing the popup. Variant A shows the popup. Variant B suppresses it entirely but still tracks exposure events.
- Multivariate (MVT): Coming soon, you can test multiple changes at the same time.
Note: You can run only one test per popup. But you can create multiple draft split tests for a popup. Then, pause the active test to run another test on the same popup.
Step 2: Variants
Here, we cover the variant settings for each kind of split test listed in the last section.
For all split test types, you’ll have at least 2 test variants: A and B. The following are variant settings common to all test types.
- Variant name: Gives a descriptive name for the variant.
- Add another variant: Adds another variant to your test. Scroll to the bottom of the Variants page to see this feature “slide up.” Once you have three or more variants, you can start deleting them if you need to.
Headline
- Variant A Headline · Current Popup: A read-only field that displays the popup’s existing title. Visitors in the control group see this headline. Edit the popup directly to change its original (control) title.
- Variant B New Headline: The headline text to show to visitors assigned to this variant. Replaces the popup’s title for those visitors.
Content
- Read our Content Test how-to guide to learn how to set up the content variants.
Settings
- Read our Settings Test how-to guide to learn how to set up the settings variants.
Popup vs Popup
- Variant A Popup: The name of the popup you selected at the beginning of the wizard.
- Variant B Popup: Select an existing popup for Variant B to test against the Variant A popup.
- Variant B Clone Current: Creates a draft copy of the source popup and assigns it to Variant B. You must publish the cloned copy before the test can start.
Holdout
There are no Holdout variant settings. Just remember the following:
- Variant A: shows the popup (With Popup).
- Variant B: does *not* show the popup (No Popup).
Multivariate (MVT)
- COMING SOON
Step 3: Launch config
Set the primary metric, traffic allocation, and stopping rules.
Primary Metric
Select the metric you want to declare a winner. You’ll still see the other metrics in the results, but only the Primary Metric determines the winner.
- Conversion Rate: Percentage of unique visitors who converted.
- Click-Through Rate: Clicks divided by exposures.
- Open Rate: Opens divided by exposures. Not available for Holdout tests.
- Custom Goal…: Track your own event. Selecting this adds a Custom Goal step to the wizard.
The following metrics are available only for revenue tracking.
- Purchase Rate: Purchases divided by unique visitors.
- Revenue per Visitor: Revenue divided by unique visitors.
- Average Order Value: Average order value.
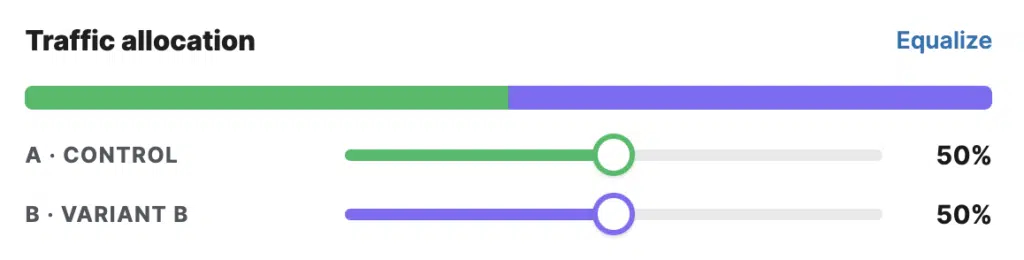
Traffic Allocation
- A variant slider: Drag to set what percentage of traffic goes to variant A. Adjusting the variant A slider proportionally balances variant B so A and B always total 100%.
- B variant slider: Drag to set what percentage of traffic goes to variant B. Adjusting the variant B slider proportionally balances variant A so A and B always total 100%.
- Equalize: Resets variant A and B to an equal split (for example, 50/50 for two variants).
Stopping Rules
Stopping rules control when the test can auto-declare a winner. You can still declare a winner manually before the test hits any threshold.
- Minimum conversions per variant (stepper, default 100): The minimum number of conversions required in each variant before the system auto-declares. Lower values produce faster decisions; higher values produce more certainty.
- Minimum duration (dropdown): How long the test must run before the system auto-declares. Options: 3 days, 7 days (recommended), 14 days, 30 days. Shorter durations can pick up day-of-week patterns rather than a true lift.
- Confidence threshold (dropdown): The Bayesian probability-to-be-best required before the system auto-declares. In other words, the probability that one variant is better than the other. Options: 90% (faster, looser), 95% (recommended), 99% (strict, slower).
- Share of qualifying traffic (slider, 10–100%, steps of 10): The percentage of eligible visitors who enter the test. Visitors outside this share see the popup normally and are not tracked in the test.
Test Summary
A read-only summary of your current settings. Shows: test name (or an auto-generated name), test type, variant count, popup name and ID, selected metric, and share of traffic.
Statistical reference (read-only)
A read-only summary of your test’s metric, confidence threshold, and share of traffic.
Below that summary is a table of detection estimates for +5%, +10%, and +20% relative lift (how much the new conversion rate changed compared to the original conversion rate). The conversions/variant estimates change depending on what you set for your confidence threshold.
Step 4: Configure Custom Goal
This step only appears when you selected Custom Goal… as the primary metric in Step 3 (Launch). Set a stable identifier for the event you will track, then use the provided snippets to fire the goal from your code.
- Goal Identifier: A unique slug identifier for your custom event (for example,
my_button_click). The field auto-formats your input to lowercase with underscores. - PHP: PHP code snippets that use the Goal Identifier you typed earlier. Copy and paste the snippet(s) you want to use to record your custom goal.
- JavaScript: JavaScript code snippets that use the Goal Identifier you typed earlier. Copy and paste the snippet(s) you want to use to record your custom goal.
Step 4 or 5: Document
Optional fields for documenting your test. These fields do not affect how the test runs. They are saved so you can search, filter, and learn from past tests.
- Name: A label for the test. Defaults to “Test #N” if left blank.
- Tags: Add tags to group tests by feature area, theme, or quarter. Type a tag and press Enter or comma to add it.
- Audience: Describe who this test targets. Note: targeting is still controlled by the popup’s own conditions—this field just records the reasoning.
- Hypothesis: What you expect to happen and why.
- Goal: The business outcome you are trying to drive—distinct from the primary metric.
Step 5 or 6: Review
A read-only summary of your test configuration before you create it.


